Getting Shit Done with Claude Code and PairCoder
If you've ever stared at a blank screen with a good idea and no idea how to start, this is for you. This curriculum teaches you how to build real software projects using Claude and PairCoder as your thinking partner and coding collaborator, not just a search engine you type questions into.
You'll learn a repeatable three-phase process that works at every scale, from the whole project down to a single feature. No computer science degree required. No prior coding experience assumed.
What is required: a willingness to build something real, break it on purpose, and keep going until it works.
Macro Ideation.
Before code exists.
First you'll build your first spec document (saved as a file called spec.md). What is a spec document? It's a short written plan that says what you're going to build, who it's for, and when you'll consider it done. Think of it like an outline for a software project, the same way a recipe is an outline for a meal.
This lesson is for anyone learning to build software with Claude (the AI assistant from Anthropic) in the loop. By the end you'll have a v1 spec written in plain language, saved as a file on your computer, ready for the review pass that turns it into hardened planning.
Every Project Has Three Phases. Today You're in the First One.
Before we touch any tool, here's the mental model the rest of the curriculum hangs on. Every software project moves through three phases: ideation (figure out what to build), implementation (build it), and review (decide if it's ready to deploy).
Today you're in ideation. By the end you'll have a v1 spec, a clear written plan that captures what you want to build, who it's for, and when you'll consider it done. What's v1? It's just shorthand for version one, your first complete draft. v2, v3, and beyond come in lesson 3 when we refine the spec by breaking it on purpose.
What is a sprint? You'll hear the word later in the curriculum. A sprint is a short focused work block where you build and deploy one piece of the project. A full-stack developer used to spend one to two weeks on what we now deploy in an hour or two with Claude in the loop.
Ideation Is the First Move in Any Build.
So far, this lesson has focused on a spec for software, because software is concrete and gives us a clear place to start. But the real point reaches well beyond code. Ideation is the work that happens before you build anything, and it looks the same whether you're building a brand, a business, a design, a movie, or software. The thing you're making changes. The process does not.
The whole framework exists to take the tedious parts of building off your plate, so your attention can go where it actually matters: the decisions only you can make. Ideation is the first of those decisions, figuring out what's worth building before you spend a single hour building it.
These three phases show up everywhere. You ideate (figure out what to make). You build it, and then you check whether it's ready to deploy. A film has a script and a storyboard before anyone rolls camera. A business has a plan before it has a storefront. A brand has a point of view before it has a logo. In every case the plan comes first, and the plan is what ideation produces. The rest of this lesson works through a real example that has nothing to do with code, to show how universal this is.
Here's a real one. Not software. A redesign of the landing page you may have arrived through. It started exactly the way good ideation usually starts: with a vague, honest feeling. The note was basically, "the landing is drab and same-same, and I don't even understand how the macro graphic works anymore."
That's not a plan. It's barely a sentence. And that is completely fine. Ideation starts from a feeling, not from a solution. The job is to take that itch seriously and turn it into something you can act on.
The temptation is to jump straight to "let's make it prettier." Resist it. Before designing a fix, we named the actual problems. The page had no contrast and no rhythm, so nothing pulled your eye. It had no "show," nothing that demonstrated the product in motion. And the signature fractal graphic, the thing meant to be the centerpiece, had faded into invisible background texture.
In plain terms, the before state was a flat, single-tone background with plain text, no depth, and no sense of movement. You cannot ideate a real fix until you can say out loud what's broken. Diagnosis is ideation. Naming the problem is half the design.
Once the problems were named, the next move was to put options forward: a few directions, at a few levels of ambition, with an actual opinion attached. Not "here are some choices, you pick." More like "here's what I'd do, and here's why," so the founder had something concrete to react to.
This is the same back-and-forth you'll run with Claude in the next section. Someone, or something, puts a proposal on the table, and the other side reacts. A point of view you can argue with beats a blank page every time.
Here's the part people skip. The concept evolved across a handful of sentences, before any real work got built. The look went from a flat cream background to a soft blue "wave-motion ombre" with frosted-glass panels fading down into dark cells.
Two quick translations, because the jargon hides a simple idea. Ombre just means a gradual blend from one color into another, here a drift that moves like light on water. Frosted glass (sometimes called neo-glass) just means a semi-transparent panel you can see through a little, like a foggy window. The point isn't the vocabulary. The point is that we reshaped the whole idea in conversation, where changing your mind costs a sentence, not a sprint. Iterate the concept while it's still cheap.
Before committing a whole sprint to a look nobody had seen move, we built one slice: the hero at the top, the ombre fade, and a single dark cell below it. Just that. Render it, look at it, react to it.
Planning an entire build around a look that's never moved on a real screen is backwards. You frame in one room before you furnish the house. The small, real slice tells you more than ten pages of description ever could.
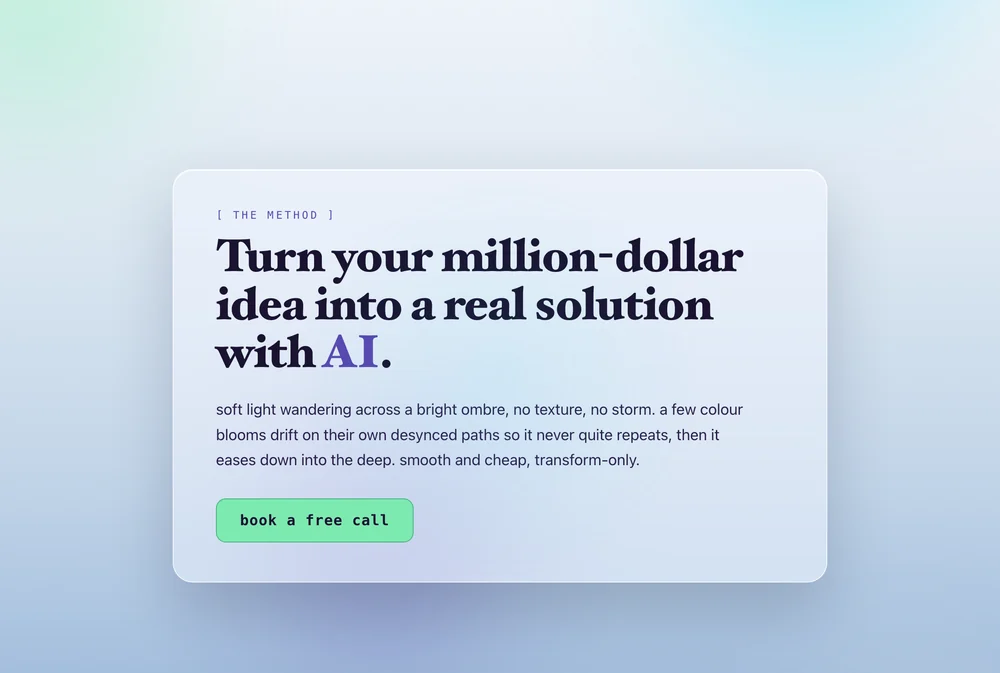
The approved direction, after diagnosing the flat before state, proposing directions, iterating the concept in sentences, and prototyping one slice first.
Look at what that slice actually was: ideate the look, build a tiny piece of it, check how it feels, then re-ideate from what you saw. That's the same ideate, build, check loop the whole project runs at the macro scale, running here at the scale of a single screen.
That's the secret the rest of the curriculum keeps returning to. The loop doesn't only happen once at the top. It nests. The same three phases repeat inside every slice of the work, whether or not that work is code.
There's a money reason to prototype the frame first, not just a taste reason. Asking Claude to build a whole feature costs real time and real effort. If you find out afterward that the layout was wrong, you paid for the wrong build. So mock the one piece you're unsure about in plain, throwaway HTML first: one screen, one card, one button, hand-edited until it looks and behaves the way you want. That kind of small hand-iteration is nearly free.
Once the mock is right, you hand it over as the target and let the real build happen once, instead of five times. Cheap iteration on the small thing saves expensive rework on the big thing. That's the same instinct as framing one room before you furnish the house, with the bill attached.
Before the Spec, Name Your Lodestar.
Before you build the spec, name your lodestar. The lodestar is a concise description of what you want to gain and how you plan to get there: the goal (the outcome you're after, and who it's for) and the projected path to it (the mechanism that carries the project from a rough idea to done, including how it earns if money's a part of it). It should be clear enough that anyone reading it knows what you're aiming at and by what mechanism you mean to get there.
A spec.md is the plan for one build, and it changes. Your lodestar is the bigger purpose and path beneath every build, and you keep it current as the project teaches you more. Keep it in its own file, a LODESTAR.md right next to your spec. Your README is the public front page anyone reads first; your lodestar is the internal compass it points toward.
Make Claude Write the Spec with You, Not for You.
The default move with Claude is to type "write me a spec for X" and accept whatever comes back. That's how you get a spec that reads fine but doesn't match the thing you actually wanted to build. Later you'll have a five-step process for development that ensures you build what you want to build rather than AI slop and running in circles.
How to use the prompts below. Each numbered step gives you a prompt to paste to Claude as its own separate message, in the order they appear. You're not combining them into one long prompt. Send each one when you reach that step, answer what Claude asks, and let the back-and-forth build the spec with you.
1. Tell Claude nothing is off the table.
What is scope? Scope is everything your project will include, and everything it will deliberately leave out. Claude defaults to trimming the scope as it drafts. It will suggest "maybe v1 should skip this" before you've even seen the full picture. You need the full picture first. You'll do the cutting yourself once the whole thing is on paper.
Time and labor are of no constraint. Do not suggest cutting scope. Tell me what the full thing looks like.
2. Make Claude ask you questions before it drafts anything.
The second default move Claude makes is to assume. It will fill in users, constraints, and success criteria without asking, because it can. That's how you get a spec that's technically complete and secretly stupid. The fix is to make Claude interrogate you first.
Before producing the spec, ask me any and all questions you need to write a spec ready for professional review. Don't assume. Push for specificity on users, success criteria, constraints, and what to leave out.
3. Answer the questions. Push back when Claude gets it wrong.
This is the work. Claude asks. You answer. Sometimes Claude misreads your answer and you correct it. Sometimes Claude misses a question that's obvious to you and you volunteer the answer. Sometimes Claude drafts a section that doesn't match what you said and you push back.
What is friction? Friction is the moment Claude says something that doesn't match your reality. When you feel that mismatch, that's your signal to push back. Within the friction, the spec becomes yours, not Claude's. If everything Claude writes feels fine, you're not paying close enough attention.
The friction is the work. The agreement is just the output.
Up to here you've been in micro ideate, figuring out what the build looks like. From here you shift into micro implement, where Claude turns the conversation into the spec.md artifact. What is an artifact? An artifact is a file you produce and keep, here the spec.md itself. You're still in the same lesson, just a different phase of the same micro cycle.
4. Scope the MVP.
By now you have an unconstrained vision on screen. It's time to cut it down to the MVP. What is MVP? MVP stands for Minimum Viable Product. Plain English: the smallest version of what you're building that still proves the idea works. Not the smallest possible thing you can build. The smallest version that still answers the question "does this approach work?"
Tell Claude which features make MVP and which features move to "future." Everything that moves to "future" lives in the Out of Scope section of the spec. Without this step you'll either build forever or deploy something so trimmed it doesn't prove anything.
5. Land the v1.
Claude produces the spec in the 7-section template below. The template is what a real spec looks like once the work is done. It's the output shape, not the starting input.
How I describe spec.md to myself: a specific plan of action. Not a vague intention. A specific one.
Rule of thumb: if your spec is under 200 words, it isn't a spec yet.
# Spec: <project name>

## Goal
What outcome are we deploying? One sentence.

## Problem
Who has this problem. Why it matters.

## Users
Who uses this. What they need.

## Features (v1 only)
Bullet list. 3 to 7 items max.

## Constraints
Tech stack, time, budget, anything that limits choices.

## Acceptance Criteria
What must be true for v1 to be considered done. Testable.

## Out of Scope
What we are NOT doing in v1. This list saves the project.
Land Your v1. Right Now. On Your Own Idea.
Bring an idea you already have. The best ones come from what you already do. What's hard at your job? Where would automation or context save you an hour a week? That's the project. The smallest annoying thing you fix yourself today is a better starting point than the biggest thing on someone else's list.
Where to find an idea if you genuinely don't have one yet is a topic for another lesson. Today assumes you already have one rattling around.
The Ideation Steps, in Order
First, write your lodestar: the goal you're after and the path you plan to reach it by. Keep it handy. Then open one Claude conversation and work straight down the list, in order:
-
Paste prompt 1, then tell Claude your idea, verbose.
Time and labor unconstrained. No scope cuts. Get into detail early. Build the vision out, every feature, every user, every constraint, every nuance. The more raw material you give Claude here, the sharper its questions land in the next step.
-
Paste prompt 2.
Ask Claude to put any and all questions to you before it drafts anything.
-
Answer the questions, one at a time.
Push back when Claude gets something wrong. That friction is the work.
-
Scope the MVP.
Tell Claude which features make v1 and which ones move to "future."
-
Land the v1.
Ask Claude to produce the spec in the 7-section template. Read it. Push back where something doesn't match what you said. Then save it as a real
spec.mdfile in a folder you can find again, with yourLODESTAR.mdin that same folder, right next to it.
You'll bring the saved spec.md, with your lodestar saved right alongside it, to lesson 3. The done criteria for v1: 200 words, all seven sections present, Acceptance Criteria that are testable, Out of Scope with at least three items.
Homework, and What's Next.
Quick recap. You learned a five-step ideation sequence: tell Claude nothing is off the table, make Claude ask questions before drafting, answer the questions and push back when Claude gets it wrong, scope the MVP, land the v1 in the 7-section template. The friction is the work. The agreement is just the output.
You now have a v1 spec and a lodestar to steer by. Save the spec as a real spec.md file in a folder you can find, with your lodestar (LODESTAR.md) right next to it. Bring both with you to lesson 3.
Resources to keep in your folder
Homework. Name your lodestar. Then open Claude and run the five-step ideation sequence on your idea. Land a v1 that hits the done criteria. Save it as a real spec.md file, with your lodestar right alongside it. Lesson 3 starts assuming you've got that v1, and your lodestar, on your computer.
Show You've Got It. Pass to Unlock Lesson 3.
Ten questions on what you just learned. Score 80 or higher and lesson 3 unlocks. Miss a few and your results point you back to the exact section to reread. Retakes are unlimited, so take your time.